

Heat-Activated Patch Adhesive
Turn leatherette, leather, embroidered and PVC patches into press-on patches, with no sewing. 12″ and 24″ rolls by the yard or flat 12″×24″ sheets.
★★★★★4.7from 79 adhesive reviewsVolume pricing counts every format in your cart.
 Leather patches, pressed in our shop
 “Hat patches that I made last year… are still holding strong.” Monica D.
 Even on beanies
Choose your format
Same adhesive, three formats. Pick by how many patches you make and how you cut them.
 Most popular
12″ Roll · by the yard
Everyday hat runs. Cut to the length you need, up to 10 yards per roll.
 Easiest to start
12″×24″ Sheet
Small batches and first projects, in a flat sheet you can cut by hand or laser.
 Best value per sq ft
24″ Roll · by the yard
Production runs, hat bars and full sheets of leatherette or leather.
Volume pricing: the more you press, the less you pay
Discounts apply automatically in the cart, no code needed. Mix formats: every yard and sheet in your cart counts toward the tier.
| Quantity | 1–2 | 3–4 | 5–11 | 12–23 | 24–35 | 36–49 | 50+ |
|---|---|---|---|---|---|---|---|
| Discount | — | 12% | 16% | 20% | 24% | 30% | 40% |
| 12″ roll / yard | $14.00 | $12.32 | $11.76 | $11.20 | $10.64 | $9.80 | $8.40 |
| Sheet / sheet | $10.00 | $8.80 | $8.40 | $8.00 | $7.60 | $7.00 | $6.00 |
| 24″ roll / yard | $25.00 | $22.00 | $21.00 | $20.00 | $19.00 | $17.50 | $15.00 |
Rolls ship in continuous lengths of up to 10 yards (13 yards = one 10-yard roll + one 3-yard roll).
Three steps. No sewing.
The adhesive goes on your material first. Then the finished patch goes on the hat.
 1
Bond it to your material
Lay the adhesive on the back of your leatherette, leather or acrylic with the paper liner facing up. Press with a flat heat press or an iron, let it cool, then peel the liner.
 2
Cut or back your patches
Laser, die-cut or scissors. Backing a batch of embroidered or PVC patches? Lay them face down, cover them with one sheet of adhesive, press, let cool and trim around the edges.
 3
Press it on the hat
Pre-heat the cap, place the patch and press. Let it cool before you flex the crown, then check the edges.
Cap press settings
Starting points for patches with our adhesive on structured caps. Test on a sample cap first, since caps and presses vary.
| Press | Patch | Top | Bottom | Pre-heat cap | With patch |
|---|---|---|---|---|---|
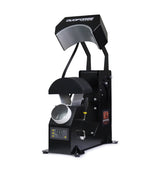
| DuoForge (dual heat) | Leather, leatherette, PVC | 300°F | 320°F | 25 s | 25 s |
| Top-heat-only cap press | Leatherette | 300°F | — | 30 s | 25 s |
| Top-heat-only cap press | Full-grain leather | 300°F | — | 45 s | 45 s (+10–15 s if needed) |
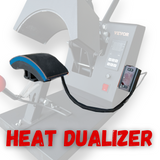
| Heat Dualizer add-on | Leatherette | 260°F | 280°F | 30 s | 30 s |
| Other dual-heat cap press | Leatherette | 270–290°F | 380–400°F | — | 45 s |
What it sticks to
- Leatherette patches (laser-engraved)
- Genuine leather patches
- Embroidered patches (add a backing)
- Acrylic patches
- Wood veneer
- PVC patches (test first)
- Trucker caps, dad caps and beanies
- Polyester, poly-cotton, nylon and Lycra
Results depend on the fabric and your press. Try one first on heat-sensitive fabrics.
★★★★★ 4.7 from 79 reviews
What makers tell us after pressing their own patches.
 Over an embroidered hat · Sandra M.
 Engraved leatherette · Stephen C.
 Flag patch · Michael R.
 Acrylic, fiber laser · John S.
 Camo caps · Jill O.
Why patches peel, and how to fix it
Most lifting edges come from the press setup, not the glue. Check these first.
The heat never reached the glue
Thick patches insulate. With heat from the top only, the adhesive under the edges may never fully melt.
Fix: add heat from below the capToo much heat on top
Raising the top temperature to make up for it can scorch or shine the patch face.
Fix: lower the top, move heat to the bottomUneven pressure on the curve
If the plate doesn’t match the crown, or the sweatband gets in the way, the edges never get full pressure.
Fix: match the platen to the cap, sweatband outThe patch moved
A patch that slides when the press closes won’t seal evenly.
Fix: heat-resistant tape or a laser alignment guideHandled while hot
The bond sets as it cools. Flexing a hot crown can pop the edges.
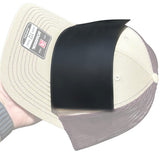
Fix: let it cool; re-press 5–10 s if an edge liftsComplete the setup
How much adhesive do I need?
Pick your patch size and how many you’ll make. We’ll do the math, volume pricing included.
Fit = how many patches fit on each yard or sheet in a simple grid. Real nesting can do better.
Questions makers ask us
Heat-activated patch adhesive for hats and apparel. Patch Crafters adhesive is a 5 mil heat-activated film that turns leatherette, leather, embroidered, PVC and acrylic patches into press-on patches. It comes in 12″ and 24″ rolls by the yard and in flat 12″×24″ sheets, and works with dual-heat cap presses, top-heat cap presses, flat presses and household irons.
Which side is the adhesive?
The paper side is the liner. Lay the adhesive against the back of your material with the paper facing up, press, let it cool, then peel the paper off.
Should I apply it before or after laser engraving?
Most makers bond the adhesive to the full sheet first, then engrave and cut, so every patch comes out press-ready. Cutting adhesive-backed material makes fumes, so always run your exhaust or fume extractor.
What heat press settings should I use?
On DuoForge, 300°F top and 320°F bottom: pre-heat the cap for 25 seconds, then press the patch for 25 seconds. Settings for other presses and materials are in our heat press chart.
Can I use a household iron?
Yes, to bond the adhesive to flat material: no steam, press and hold instead of sliding, then let it cool. For hats, a cap press gives the even heat and pressure a curved crown needs.
My patch edges lifted. What went wrong?
Usually the heat never fully reached the adhesive under the edges (a thick patch on a top-heat-only press), or the cap was flexed while hot. Add heat from below, let it cool, and re-press the edge for 5–10 seconds.
Does it work on embroidered and PVC patches?
Yes, many customers back their embroidered and PVC patches with it. Lay the patches face down, press a sheet of adhesive over them, let it cool and trim around the edges. Test one PVC patch first, since some soften with heat.
How many patches do I get per yard?
A 12″ yard covers up to 72 patches of 3″×2″ cut edge to edge, or about 55 with 1/8″ spacing. A 24″ yard covers up to 144, and a 12″×24″ sheet up to 48. Use the calculator above for your size.
Do volume discounts combine across formats?
Yes. Every yard and sheet of adhesive in your cart counts toward the tier, and the discount applies automatically in the cart.
How are the rolls shipped?
Rolls are cut to your length, up to 10 yards per continuous roll (13 yards ship as a 10-yard roll and a 3-yard roll). Supply orders over $80 ship free within the contiguous US.